
 |
| 2005: Condition of boat still mostly intact |

Click on this picture to enlarge it and where the blue seat cushion is, you can see the seams separating and the foam showing through. That same process was taking place on all the seats.
 |
| Notice the zip ties and bungee cord holding the bimini top in place! Classy, huh? |
 |
| Can't seem to beat the black mold overtaking the seat covering. |
The carpet was beginning to wear through to the deck and it was impossible to keep up with the black mold. However, we still enjoyed taking her out on the lake for a day of family fun or fishing. Water was everywhere and getting the boat out onto the lake was easy.
 |
| Enough water to do 360's in the canal....even in the pontoon boat! Approximately 7' deep. |

Look to the right of the boat and you'll see the dock that my brother-in-law built for us. The water level was high enough to walk from the dock directly onto the deck of the pontoon boat. This made getting in and out of the boat an easy task.
But then came the years of drought. Three of them to be exact. The water receded more than 6 feet. And making a long story short, I waited too long to get the boat out of the lake and she became grounded. Literally, grounded. The pontoons were sitting on dry ground. She stayed there for three years and rotted away in the brutal Florida sun, rain and heat. And this is what we were left with:
 |
| And then the drought starts.... |

Yep, that's the same dock my brother-in-law built. Clearly a 6-10ft drop in water level. That made any boating impossible. This is where the boat was grounded for almost 3 years.
 |
| Yep, that's the same canal we used to be 7' deep! |
Then for a lovely, but brief time it rained...just long enough to raise the water high enough to get our pontoon boat out of the lake. But before we did, I spent a day stripping all of the old furniture out of the boat. It was a bigger mess than I thought.


 |
| It took my Ford F350 diesel to pull that beat up boat out of the water. |
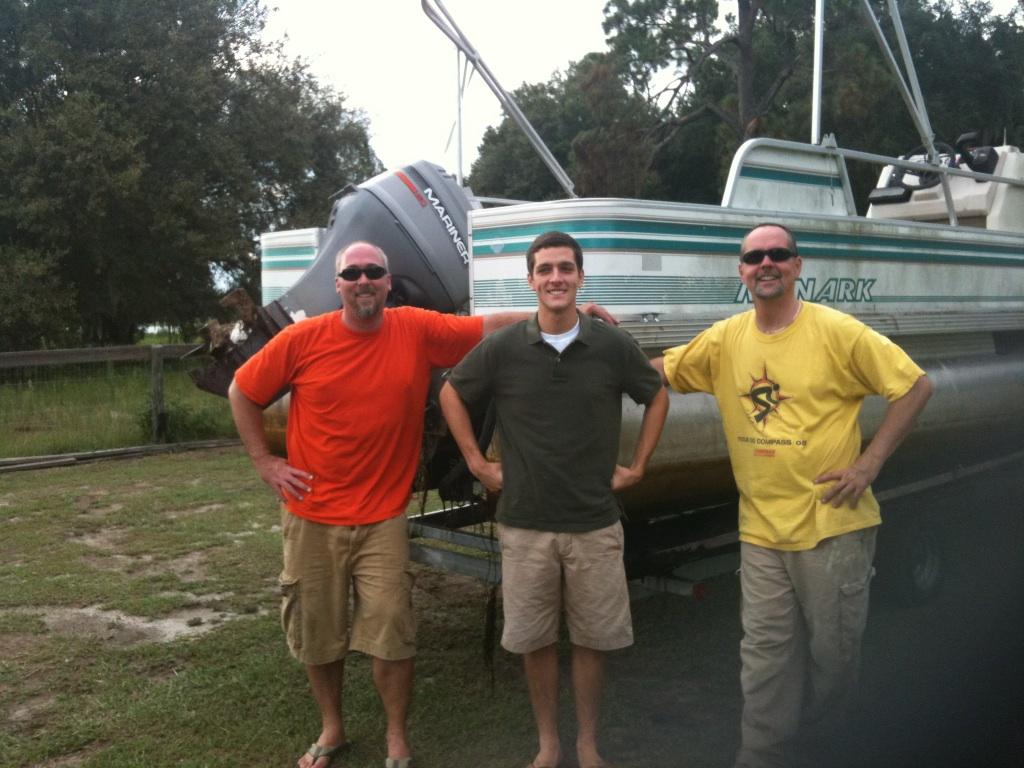 |
| Thanks, guys! I couldn't have gotten it out without you~! |
The photos that follow will show our adventure in restoration. (click on pics to enlarge)


 |
| Not looking forward to disassembling the steering, throttle and electrical circuits. |


I wanted to use 3/4" pressure treated for the floor, but my research (which was lengthy) told me that I should avoid PT. Has something to do with a corrosive interaction between the chemicals used in PT and any metals (especially aluminum) that it comes in contact with. So I ordered 3/4" marine grade plywood from Belleview Building Materials in Belleview, Fl. It's our local mom & pop lumber store and they gave me a much better deal than both Lowes or Home Depot. It still probably added $250 to my total flooring costs over the cheaper alternatives....we'll see if it's worth it in the long run. We also sealed all the edges with multiple coats of Extreme Weather outdoor latex paint. Maybe overkill....maybe not. For an extra $15 I'll take my chances.


Next was a new prop for the motor, new wiring, lights, carpeted bunks and "E" rated tires for the trailer. Unfortunately, the more you tear into this.....the more stuff you find that needs repaired or replaced.
 |
| Useable props need the WHOLE blade to function properly! |


After my wife and I scraped off all the decals, we used a degreaser, steel wool, sandpaper and lots of elbow grease to get the old fence rails back to the bare aluminum finish. Then, while I was at work, my wife taped off the fence rails and panels so that when I got home I could spray paint them. Good teamwork.

We used an aluminum primer spray paint by Rustoleum for the fence panels and then a lightly textured latex paint for the final color we wanted. New decals were soon to follow.


Next, we reinstalled the aluminum floor trim, tie downs and cleats....then the fence rails.


We painted the interior panels that we knew would not be hidden behind the new furniture we ordered to give it some continuity.
Next came the new decals...


And a new 8' X 10" bimini top which I ordered from "The Canvas Guy" on Ebay. I was very pleased with the quality. I did have to put it together, but everything fit splendidly and was very easy to assemble.


After rewiring the trailer lights and adding some new navigational lights, I also decided to include some docking lights for good measure.

The new console, gauges, switches and steering wheel are here. The furniture should arrive in about 1 week. Then we can move this project toward completion.
It's Here!

So, the furniture arrived today. I ordered my furniture from Veada Industries out of New Paris, IN. If price is the most important element in your rebuild, then pick just about any pontoon boat furniture retailer on the internet. Their prices are all very competitive. If you have to have your boat furniture tomorrow.....don't pick Veada. They tell you upfront that it will take 8 weeks to receive your furniture. Mine came exactly 1 day shy of 8 weeks. But I chose Veada for a number of reasons; (1) They build your furniture to order. That's why it takes so long. (2) The price was very competitive. (3) When it arrives it's packed securely, padded and completely assembled. The only thing you have to do is secure it to the deck. Following are some pictures of the placement of the furniture (apologies for the repetitive pics)


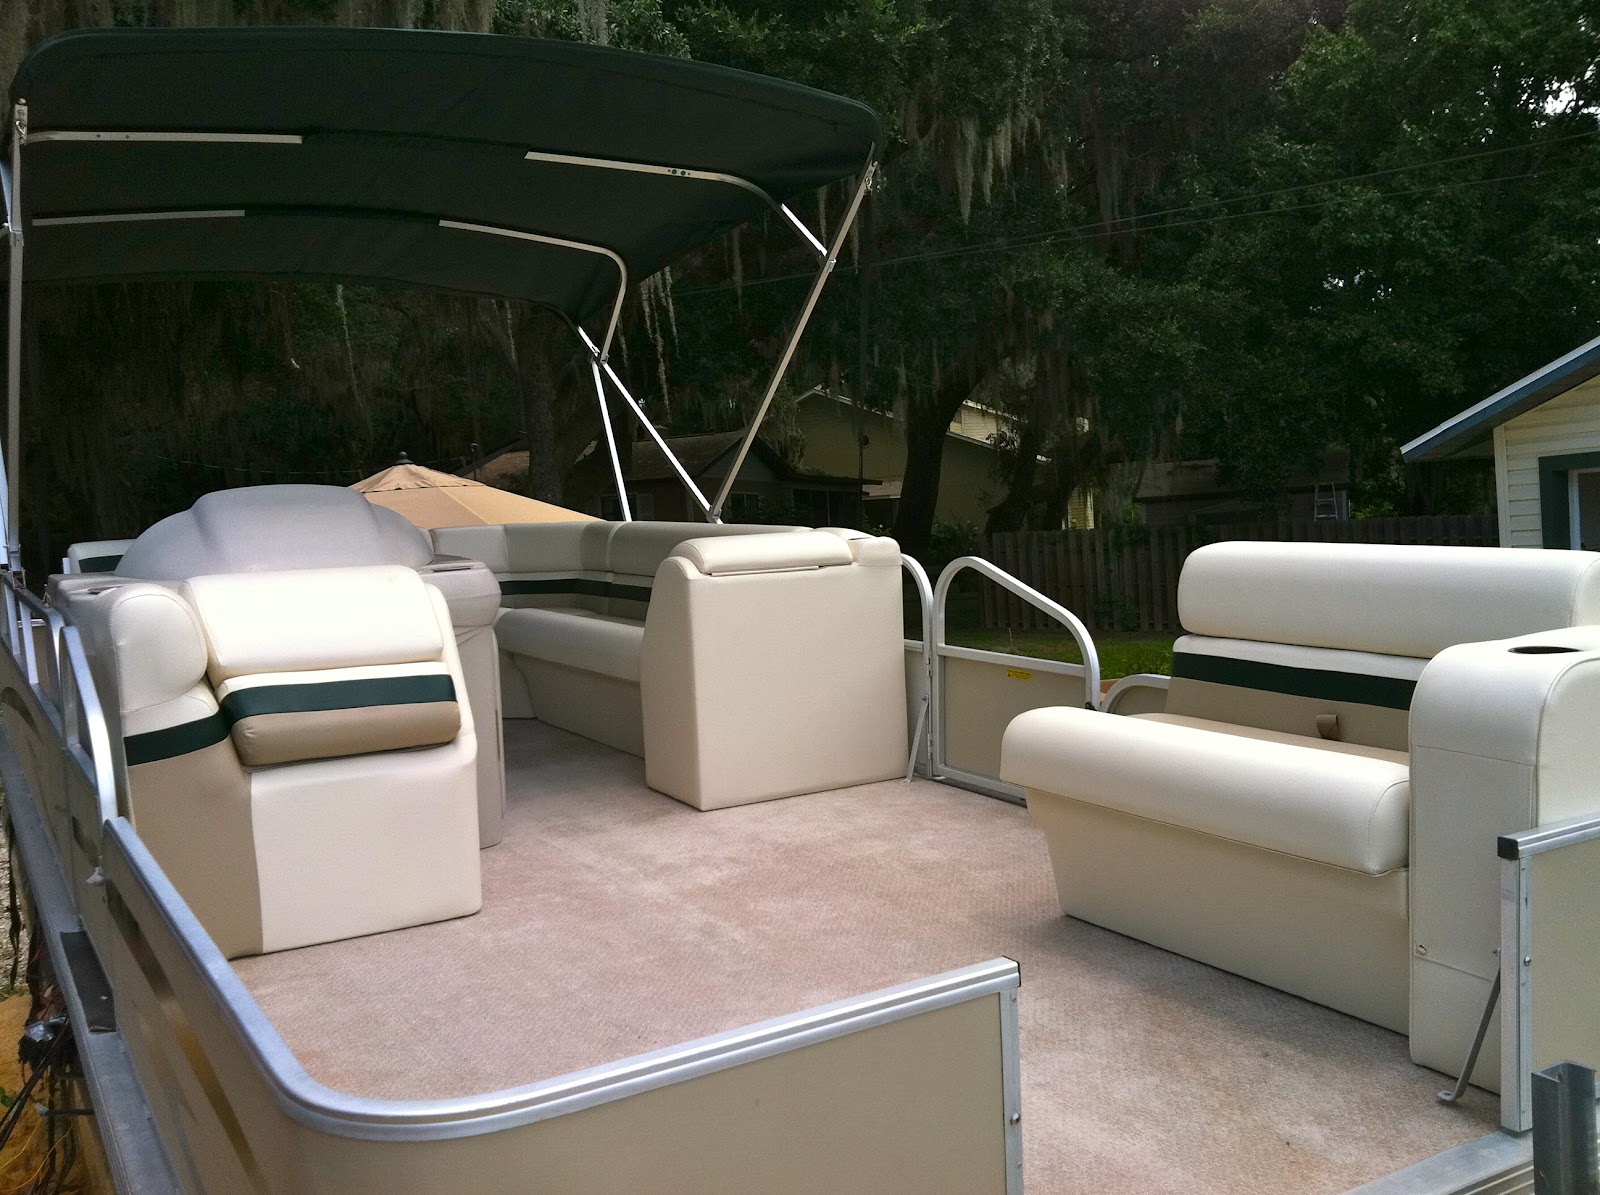


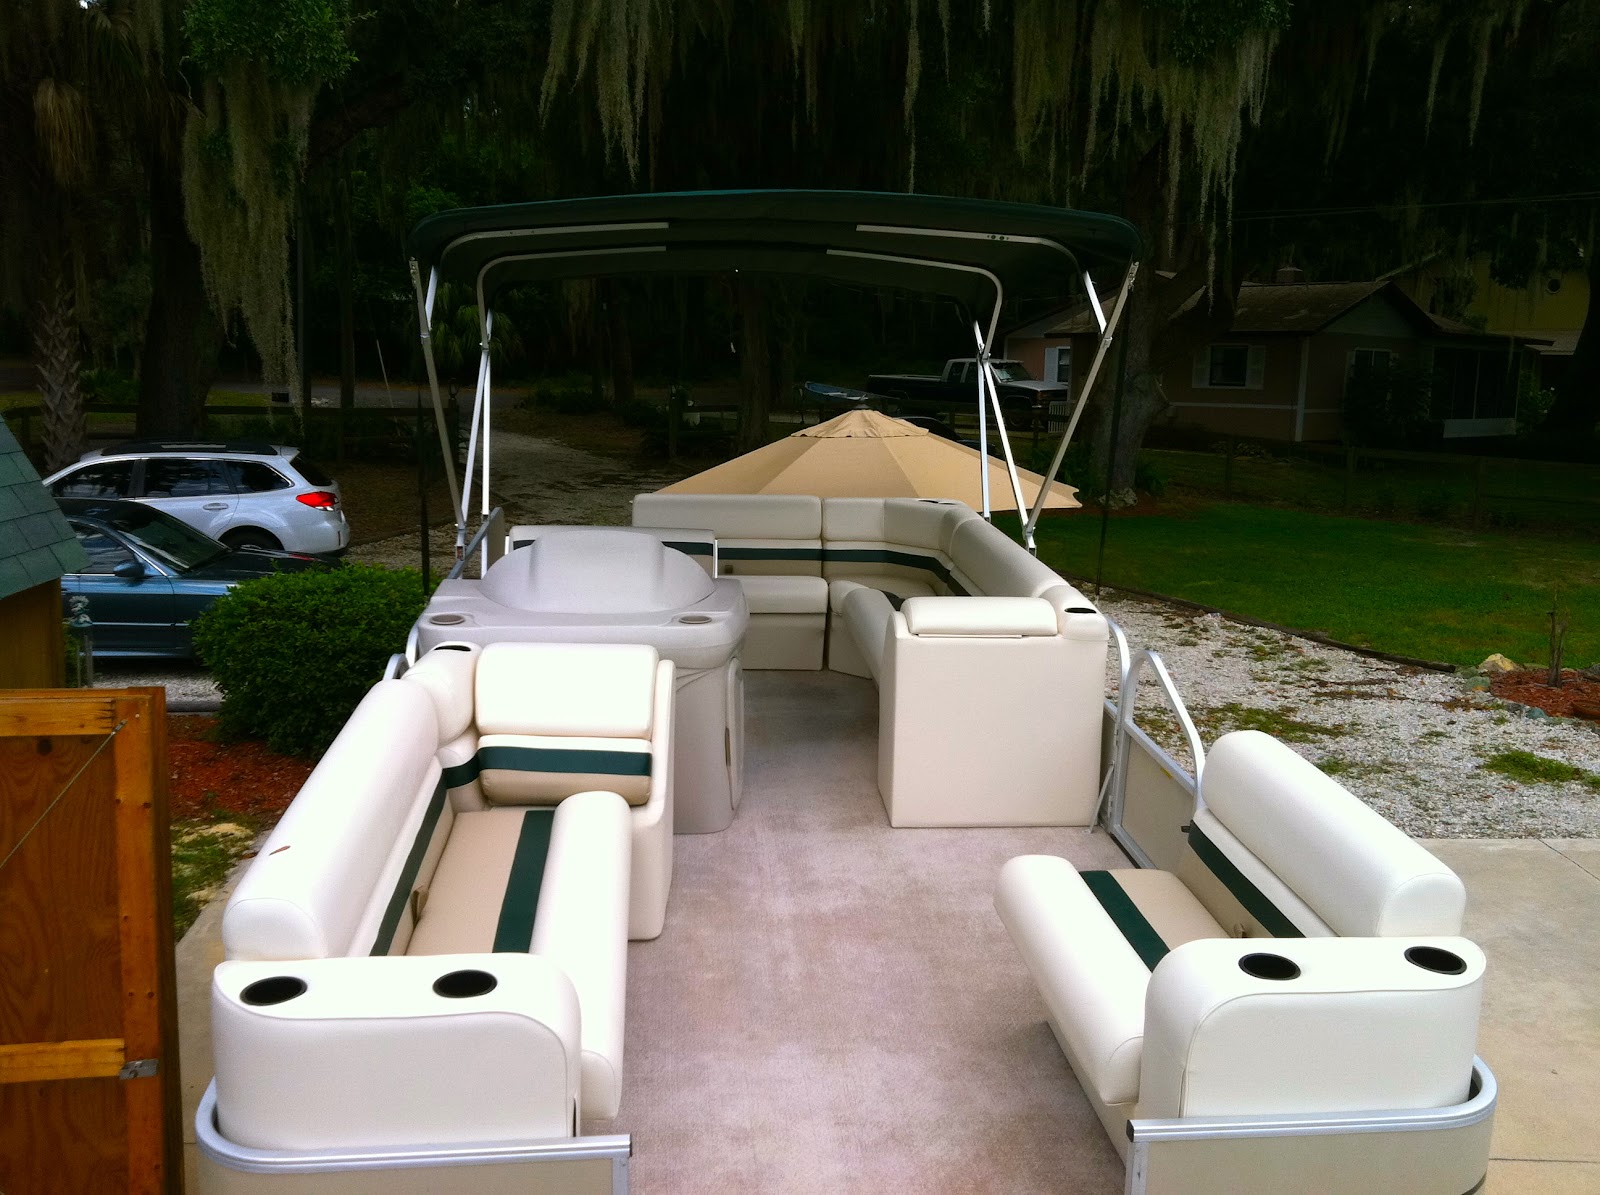


This morning I finished securing all of the new furniture to the deck and then moved on to what, in my opinion is the most challenging part of the project. Making sure the steering cables, throttle controls, binnacle and wiring are re-connected properly so as not to blow up all my hard work to this point.
 |
| Man, it's hot in here! |
So far.....so good!


Hello Pratt,
ReplyDeleteThe boat turned out awesome...
Can you tell me where you got the decals..?
Thanks
Robert
cyclone1521@gmail.com
nice job, I am looking for a beater pontoon to do the same thing with. Instead I want mine to have a room with large sliding windows and screens, and I am thinking about using home furniture on the inside, or maybe RV type furniture. Looking at your photos makes me wish I could start mine today, lol!!!!!
ReplyDeletenice job, I am looking for a beater pontoon to do the same thing with. Instead I want mine to have a room with large sliding windows and screens, and I am thinking about using home furniture on the inside, or maybe RV type furniture. Looking at your photos makes me wish I could start mine today, lol!!!!!
ReplyDeleteWhen we bought our home in 2005, we inherited a 1996 Monark Suncaster pontoon boat. That made the boat roughly 10 years old and every ... 1pontoonboats.blogspot.com
ReplyDeleteLove your story. I am doing the same thing to a 20 foot fisher. You helped me with what products to use to paint the fencing. Your toon looks great.
ReplyDeletePorch Post Columns! The Leader in Vinyl Composite Porch Deck Railing, Vinyl Porch Products, Round Columns, Fence, ADA Railing, Pergolas and More. Durable – won't rot, crack, peel o r yellow. cedar fence installation
ReplyDeleteWe are in the process of a complete restore also. Can I ask what product you used to clean the "toons"? They look great!!
ReplyDeleteVery informative, good job guys and thanks for sharing such a awesome blog. Leather car seat covers Oshawa Ontario
ReplyDeleteSeat covers in Oshawa Ontario
This is the nice post.Thanks for sharing this.High Quality Boat Upholstery USA
ReplyDeleteAffordable Boat Upholstery Services in USA
I have never posted on Pintrist before but was able to follow your resto....I am in the middle of the exact same job....congrats on yours.....it turned out great.
ReplyDeleteWhat are you cleaning your toons with?
ReplyDeleteWhat brand of textured latex paint did you use to finish? Love your finished job! We are almost finished with ours.
ReplyDelete